An Introduction to GeoGig
This workshop describes how to use GeoGig along with other software packages for spatial data management, showing a typical workflow.
Instructions are given for all steps performed in the workshop, both for GeoGig and for all additional applications used, but the workshop focuses primarily on GeoGig and assumes user-level knowledge of all other applications. For more information about them, please refer to the corresponding documentation of each program.
Sample data
All exercises in this workshop are based on a sample dataset with OpenStreet Map data. You can download it as a zip file from here. Unzip it in a folder of your choice.
Prerequisites
The following software is required to be installed in your system (followed by download instructions):
- GeoGig
- GeoServer with GeoGig Extension
- PostGIS (including
shp2pgsql) - QGIS 2.0
GeoServer and PostGIS are installed as part of OpenGeo Suite. This workshop assumes than you are using OpenGeo Suite, but will describe independent installation of these two components. Once installed, most of the workshop tasks should be identical, and if any difference exists between the OpenGeo Suite version and the canonical one, it will be pointed out.
Installation procedures for each of the above applications are described next.
Installing GeoGig
To install GeoGig, follow these steps.
If not already on your system, install a Java JDK. GeoGig requires Java 8 or higher to run. Make sure the java executable is accessible (i.e. check your PATH environment variable) and the JAVA_HOME environment variable points to the JDK or JRE installation directory.
After the JDK is installed, navigate to http://geogig.org and click Download.
Extract this archive to your preferred program directory. (For example,
C:\Program Files\GeoGigor/opt/geogig.)Note
The same packages can be used on Windows, OS X, and Linux.
Add the bin directory to your
PATHenvironment variable.
When finished, you should be able to run the geogig --help and see the command usage.
Installing GeoServer with GeoGig extension
You need to have GeoServer installed in your system, with a version higher or equal to 2.3.
Installation instructions can be found in the GeoServer documentation.
If you are using OpenGeo Suite, GeoServer should already be installed in your system, but it does not contain the GeoGig extension. You can skip the GeoServer installation, but you should install the GeoGig extension as described above.
Installing PostGIS
To install PostGIS, first you must install PostgresSQL. Binaries are available for different OSs here.
Then, install PostGIS on your PostgreSQL. Packages and iinstall instructions are found here.
As in the case of GeoServer, if you have installed the OpenGeo Suite, you should already have PostGIS, including the shp2pgsql utility, installed.
Installing QGIS
To install QGIS 2.0, you can download binaries from the QGIS website.
The OpenGeo Explorer plugin is used in this workshop. It is not a core plugin and it has to be installed manually. Installation instructions can be found in the OpenGeo Explorer documentation site.
Setting up
Once the above software is installed, some initialization is needed before starting working with them. In particular, PostGIS and GeoGig both need to be set up, and the setting up procedures are detailed next.
Setting up GeoGig
A user has to be defined in GeoGig before you can commit data to a GeoGig repository and create new snapshots.
To define a new user, open a console and type the following.
geogig config --global user.name "Author"
geogig config --global user.email "author@example.com"
Replace the user name and user email with your own credentials
All commits that you do now will be contain that author information. Individual user name and email can be defined for a give repository, but if those are not defined, GeoGig will use the global value that we have set up with the above commands.
Setting up PostGIS
A database is required to work with PostGIS. We will create a new database named geogig-ethiopia that we will use for storing all the data used in this workshop.
The database can be created from the pgAdmin II utility. Open pgAdmin III
You should have a single server entry. Double-click on it to connect and enter postgres as the password in the dialog that will appear.
We will now create a user that we will use for connecting to the database.
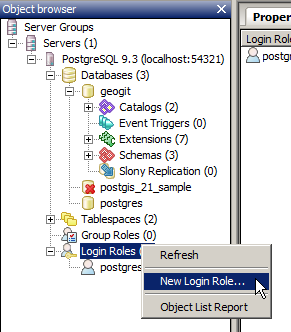
In the object browser, under Login roles you should have a single user name postgres. Right-click on the Login roles item and select New login role.
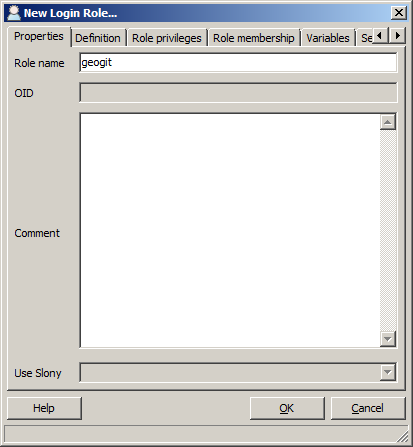
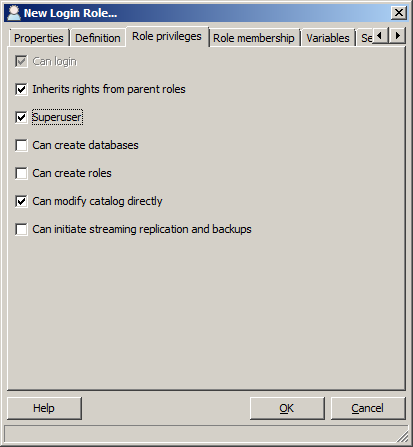
Fill the first tab of the dialog as shown below, entering geogig as the user name
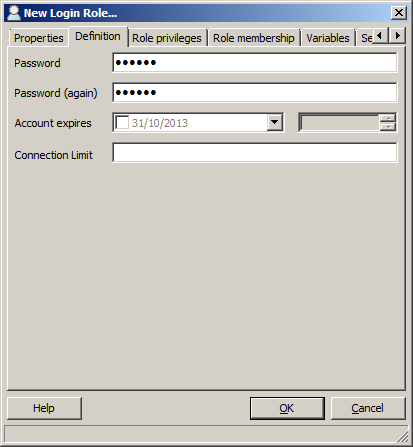
In the second tab, enter the password corresponding to that user (use geogig as password)
In the Priviledges tab, make sure the Superuser box is checked, to allow the user full permission.
Now the user should be defined. Let’s create the database.
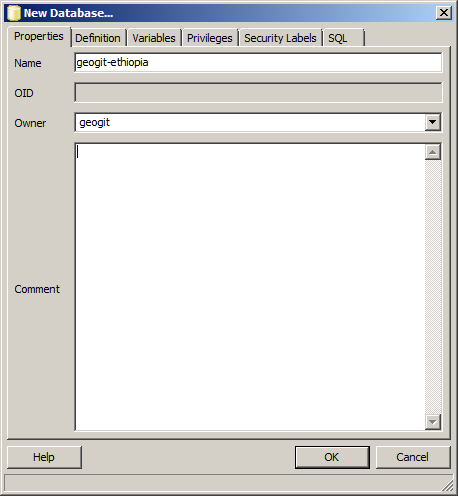
Right-click on the Databases item and select New Database.
Fill in the New Database form as shown below and click OK.
- Name:
geogig-ethiopia - Owner:
geogig
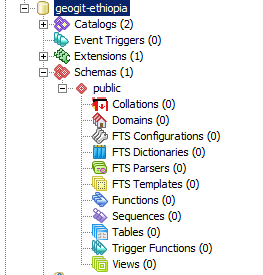
Select the new workshop database and open it up to display the tree of objects. You’ll see the public schema.
Click on the SQL query button indicated below (or go to Tools > Query Tool).

Enter the following query into the query text field to load the PostGIS spatial extension:
CREATE EXTENSION postgis;
Click the Play button in the toolbar (or press F5) to Execute the query.
The database is now created and we can already add data to it and create new tables in it.
Preparing and importing the data
The sample data zip file contains several shapefiles that we can import into the PostGIS database that we have just created.
We can use QGIS to do the import. First, start QGIS.
Make sure that the QGIS browser is visible, by enabling it in the View/Panels menu. It should appear by default on the left-hand side of youor QGIS window.

Open the OpenGeo Explorer (go to the OpenGeo menu), which should appear on the right hand side of your QGIS window.
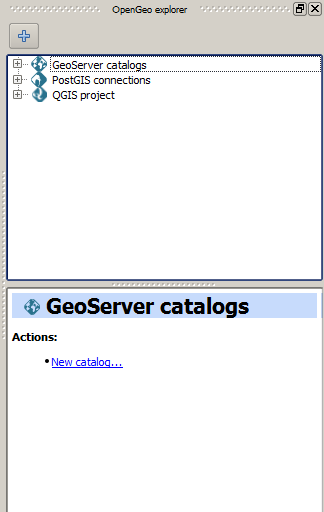
Now define a connection to the PostGIS database. Right click on the PostGIS connections entry in the browser, right-click on it and select New connection. Fill the dialog as shown below.
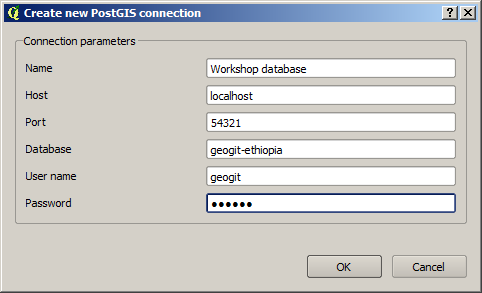
Use geogig as pasword. If you are running a standard PostGIS instead of the OpenGeo Suite one, your port would probaly be 5432 instead of 54321.
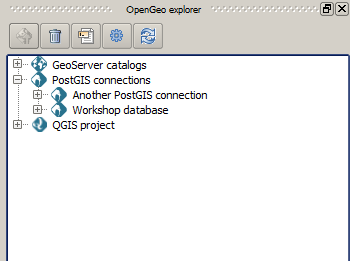
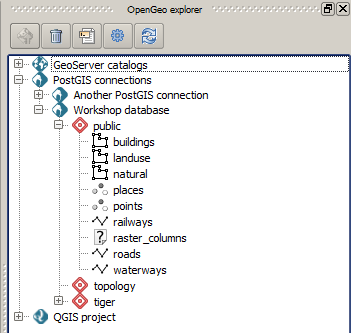
The PostGIS connections entry should be updated and populated with the current connections defined in QGIS, among them the one that you have just created.
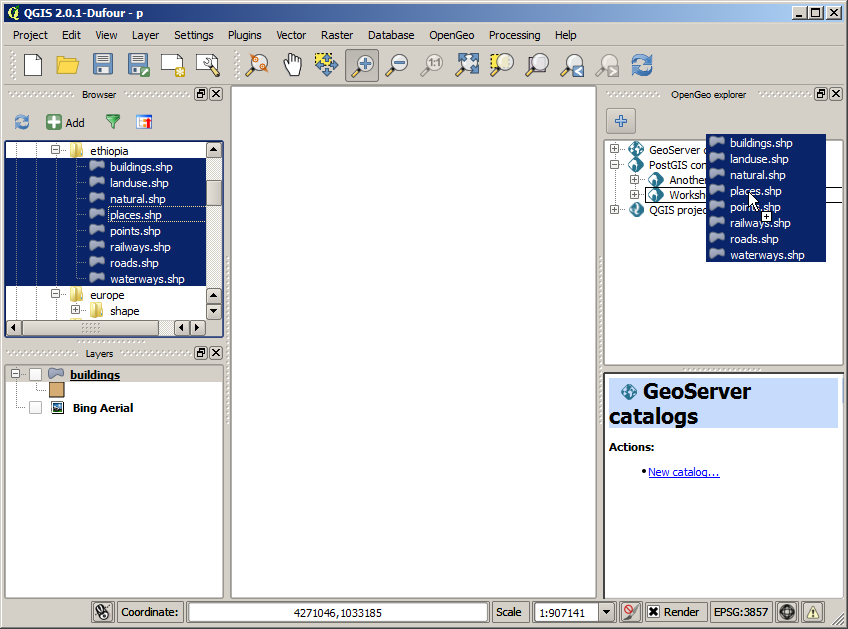
You can import layers by simply dragging and dropping the corresponding files from the browser and into the connection item in the OpenGeo Explorer (you can also drop them into the PostGIS item in the QGIS browser, but that is not so practical and it will not give you the option to import as single geometries, which is important in this case for some of the work we are going to do later).
Select all the shapefiles from the sample dataset and drop them into the connection that we have defined.
A dialog will be shown to configure some parameters before importing. Make sure you set them as shown in the figure below.
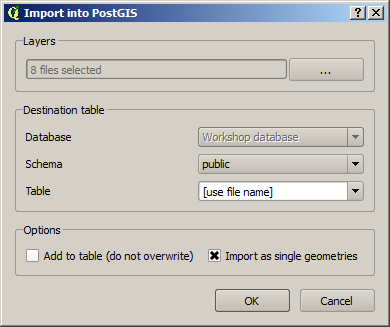
It is important to check the Import as single geometries check box, since, as we said, that will be needed for our further work.
Click on OK and the files will be imported, creating a separate table for each of them.
Exploring the data in QGIS
You can open any of these tables in QGIS to visualize it and explore it. To do it, just drag and drop the corresponding table item into the QGIS canvas and a new layer will be created. Add the buildings layer.
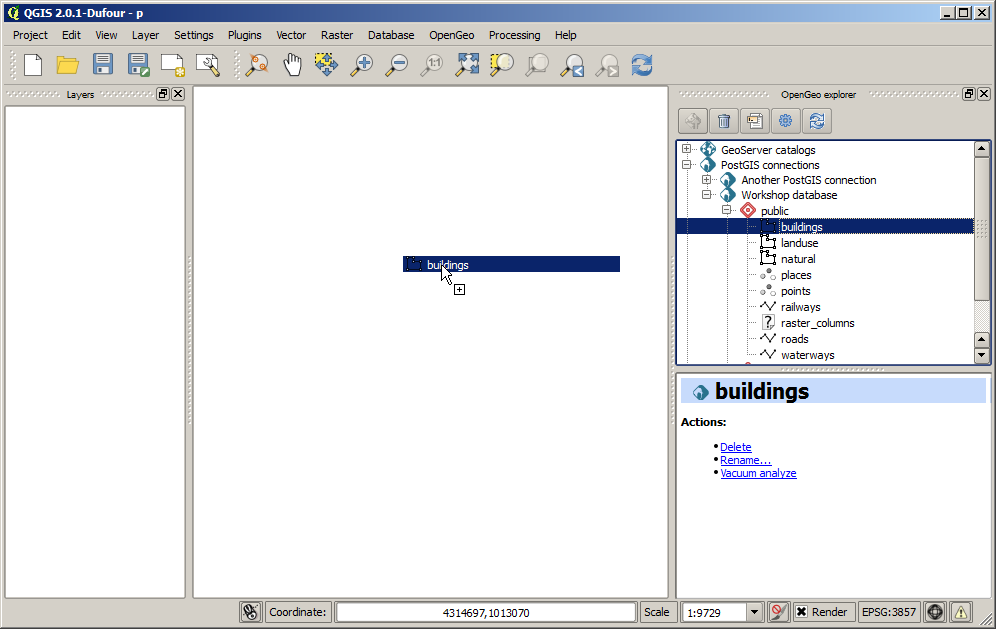
It should be shown in the QGIS canvas to its full extent.
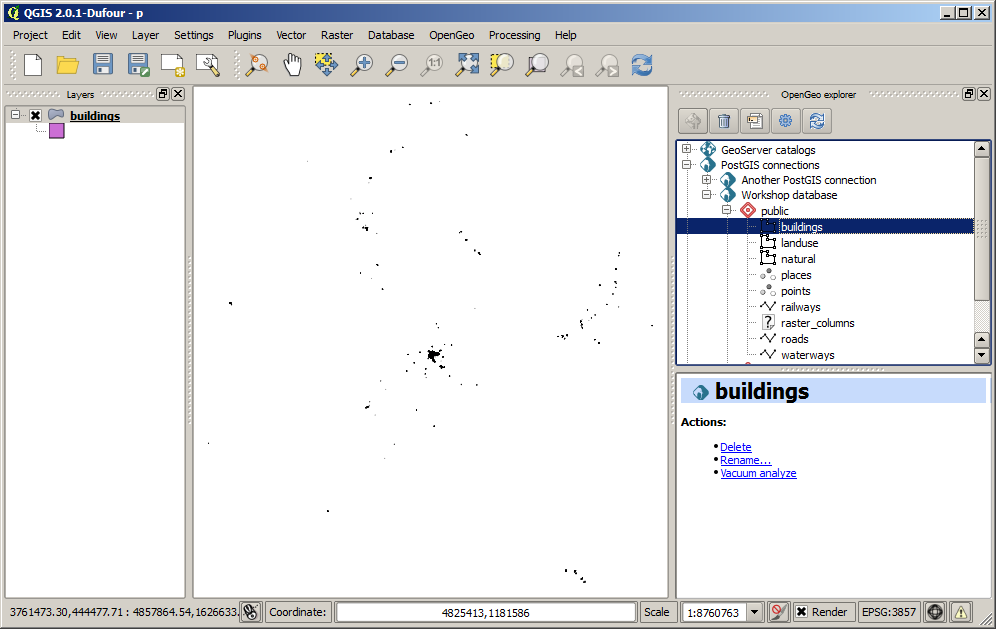
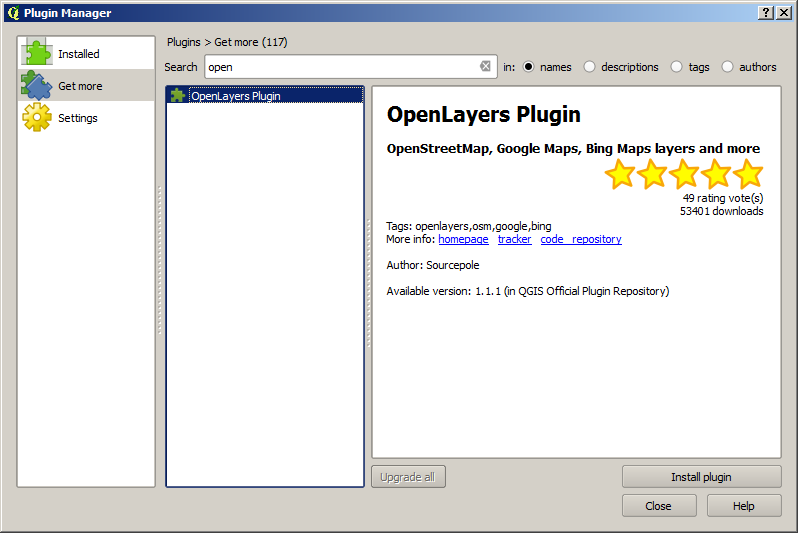
To enhance the visualization, you can add a base layer. A very useful plugin is the OpenLayers plugin, which greatly simplifies adding some of the most common base layers, such as Google, Bing or OSM. You can install it opening the Plugin Manager, selecting the Get more section and then searching for OpenLayer
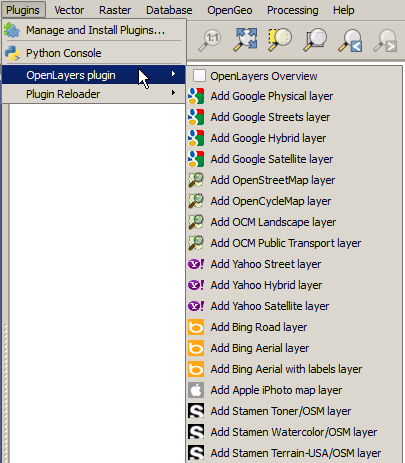
Now in the Plugins menu you should have a new entry where you can select the layers to add.
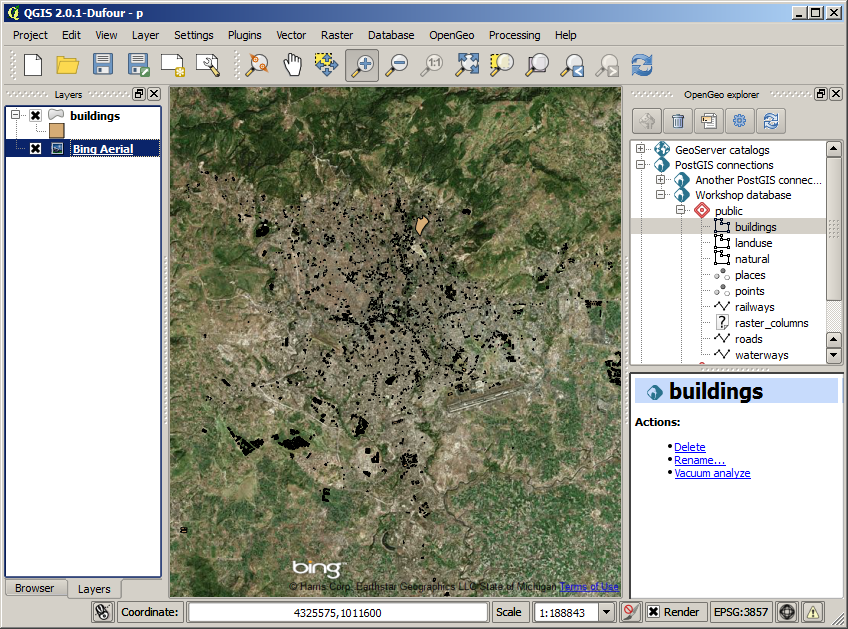
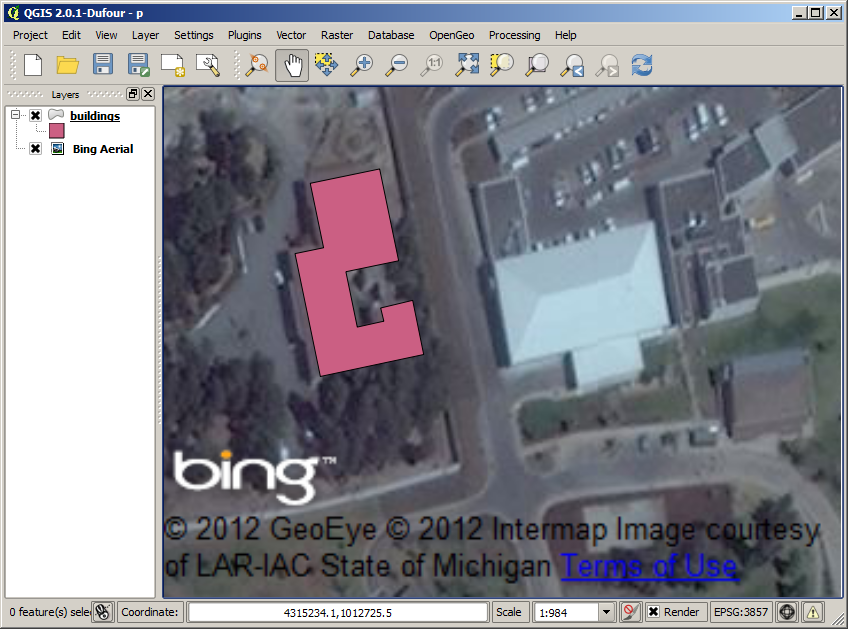
Below you can see the buildings layer with the Bing aerial image, zoomed on the city of Adis Ababa.
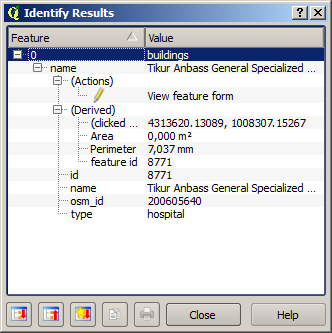
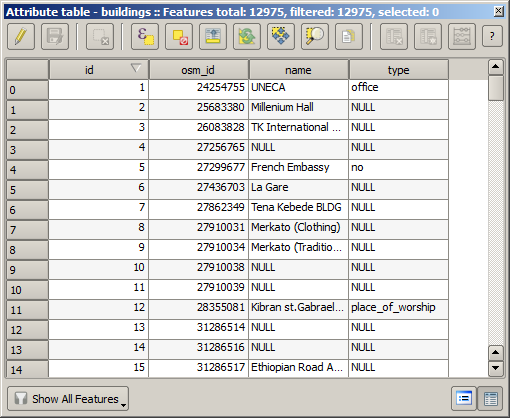
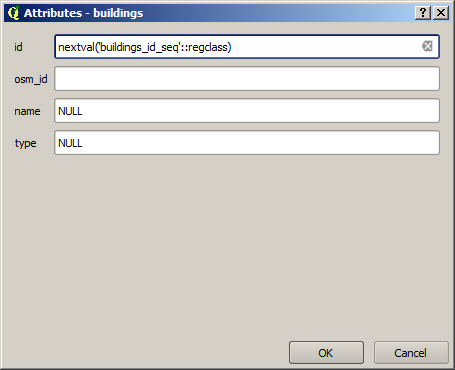
You can query the data in the PostGIS layer to know more about the buildings it contain. Select the identify tool by going to the View/Identify features menu entry. Now select the buildings layer by clicking on its name in the layers list. Click on any of the polygons and a dialog like the one shown below will appear, containing information corresponding to that polygon.
The full table of attributes for all the features in the layer can be shown by right–clicking on the layer name and selecting Open Attribute Table in the context menu.
Creating a GeoGig repository and importing data
The PostGIS database already contains the data we are going to work with, so we can now initialize a GeoGig repository where we will keep all the history and different version of that data. The PostGIS database will be the one we will work with to edit and extend the data it contains, and the GeoGig repository will store the history of that work.
Open a console and move to a folder where you want to keep you geogig repo. Under it, create a folder named geogig_ethiopia and move into it.
$ mkdir geogig_ethiopia
$ cd geogig_ethiopia
To initialize a GeoGig repository there, run the following command.
$ geogig init
Initialized empty GeoGig repository in [parent_folder]\geogig_ethiopia\.geogig
If you look at the content of the folder now, you will see that a folder named .geogig has been created. That is where all the data of the repository will be stored.
To import the data from the PostGIS database, run the following commands:
$ geogig pg import --database geogig_ethiopia --port 54321 --user geogig --password geogig --all
This tells GeoGig that you want all tables in the geogig database, and uses the credentials of the geogig user that we created to connect to the database. For each table in the PostGIS database, it will create a new tree in the repository.
Once imported, the data will be in the so called working tree. It is not yet stored in the repository database and it does not constitute a version of the data, but you can see that there are changes in the working tree by running the status command.
$ geogig status

# On branch master
# Changes not staged for commit:
#   (use "geogig add <path/to/fid>..." to update what will be committed
#   (use "geogig checkout -- <path/to/fid>..." to discard changes in working directory
#
#      added  points
#      added  points/127
#      added  points/2077
#      added  points/695
#      added  points/525
#      added  points/1532
#      added  points/1551
#      added  points/2414
#      added  points/1931
[...]
#      added  points/1598
# 92043 total.
There are 92043 new features in the working tree. To see how they are organized in the working tree, use the ls command
$ geogig ls
Root tree/
    points/
    landuse/
    waterways/
    railways/
    natural/
    buildings/
    places/
    roads/
Each one of the trees above correspond to one of the tables that have been imported.
Creating a new snapshot in the repository
You can add the feature in the working tree to the staging area by using the add command. From there, they are ready to be used to create a new version.
$ geogig add
Staging changes...
100%
92035 features and 8 trees staged for commit
0 features and 0 trees not staged for commit
Creating a new snapshot is done with the commit command. Enter the following in the console.
$geogig commit -m "Initial add"
[fc9e9e6d97e979293a028857d275eef31e8a0ce5] Initial add
Committed, counting objects...92035 features added, 0 changed, 0 deleted.
The new version is now created and is identified with the “Initial add” message.
Examining the log
You can explore the repository history using the log command.
$ geogig log
Commit:  fc9e9e6d97e979293a028857d275eef31e8a0ce5
Author:  volaya <volaya@boundlessgeo.com>
Date:    (9 minutes ago) 2013-10-31 10:57:02 +0100
Subject: Initial add
Right now, there is only one commit, but as we work on our data and create new snapshot, we will be adding more. Notice that each commit has a message that you define when running the commit command, but it is also identified with a unique 40-character string ((fc9e9e6d97e979293a028857d275eef31e8a0ce5 in the example above but you will not have the same one, since it is computed based on the properties of the commit such as the commit date, which will be different in your case) . You can use these string to refer to all kinds of elements in a GeoGig repository, since all of them have one of such identifiers. We will see examples of that later on.
Editing the PostGIS data in QGIS
We can now go back to QGIS and work on our data.
Make sure you have the building layer opened in QGIS, based on a connection to the buildings table in the geogig_ethiopia database.
The Bing image that we have added as base layer shows some building that are not digitized and included in the buildings vector layer. We will digitize one of them and then create a new snapshot in the GeoGig repository with the updated data.
Open the attributes table of the buildings layer and locate the feature with the identifier 10011 (features are ordered by ID by default). Select the corresponding row and then click on the Zoom map to the selected rows button. This will zoom your view to an area where there is a large building that is missing in the buildings layer and we can digitize.
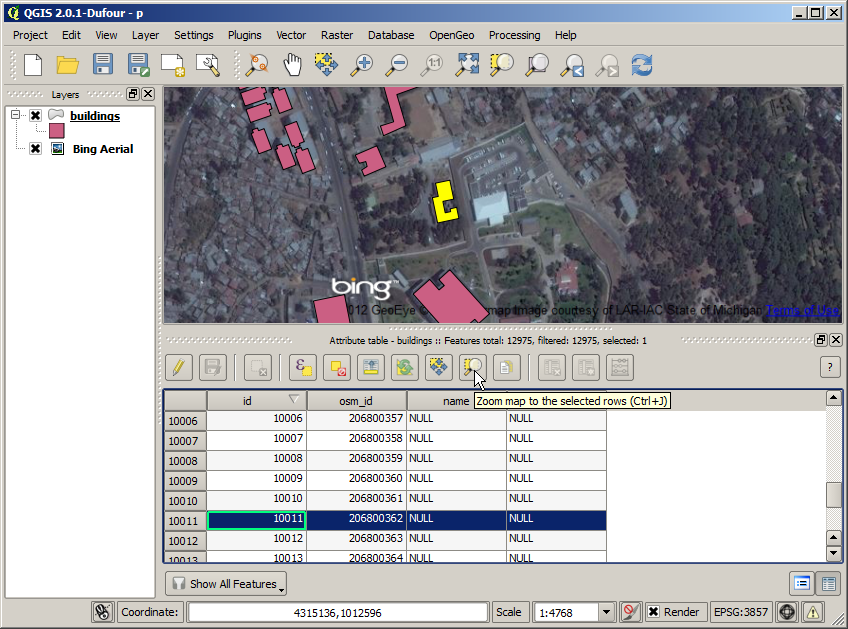
You can zoom out one level to see it more clearly.
Right click on the layer name in the layers list and select Toggle editing. This will put the layer in edit mode so you can add new features, delete them, or edit them.
Select Add feature from the Edit menu.
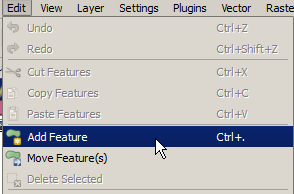
Now you can click on the canvas to add points to delineate the building that we want to digitize. Once you have entered all the points, right-click to finish editing the geometry. A dialog will appear where you should enter the attributes corresponding to the new feature you are adding.
Since we do not know the osm_id, you can leave that field blank. The expression in the first field will assign a correlative id to the feature based on the id’s used by the other features in the layer. Click on OK and the new feature will be added.
That feature is still only in the editing buffer and hasn’t been stored in the database that contains the layer data. To store the changes, right-click on the layer name and select Toggle editing again. QGIS will ask you if you want to save your edits.
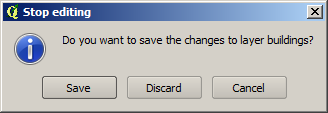
Click on Yes and your PostGIS database will be updated.
Commit changes from PostGIS to GeoGig repository
The database now contains different data to the one that we imported into GeoGig and used to create the first snapshot. We can create a new snapshot by re-importing the modified database and following a process similar to the one we followed for the first import.
First, import the data by entering the following command in the console.
$ geogig pg import --database geogig_ethiopia --user geogig --password geogig --table buildings --port 54321
Importing from database geogig_ethiopia

Importing buildings        (1/1)...
100%
Import successful.
We have only modified the buildings table, so there is no need to re-import the rest of the tables. The --all argument has been replaced by --table buildings to indicate that we only want to import the buildings table.
We can check that the imported table is different from the one in the repository by running the status command.
$ geogig status
# On branch master
# Changes not staged for commit:
#   (use "geogig add <path/to/fid>..." to update what will be committed
#   (use "geogig checkout -- <path/to/fid>..." to discard changes in working directory
#
#      added  buildings/12976
# 1 total.
It reports that a new feature has been added.
To put that new feature in the staging area, run the add command.
$ geogig add
Counting unstaged elements...1
Staging changes...
100%
1 features and 0 trees staged for commit
0 features and 0 trees not staged for commit
And then use the commit command to create a new snapshot.
$ geogig commit -m "Added building"
100%
[c1a072734c9de17dc98dfec74d8ce169b94b90c2] Added buildings
Committed, counting objects...1 features added, 0 changed, 0 deleted.
Inspecting the log and the differences between snapshots
The history of the repository now contains two different snapshots. The output of the log command will now show something like this:
$ geogig log
Commit:  c1a072734c9de17dc98dfec74d8ce169b94b90c2
Author:  volaya <volaya@boundlessgeo.com>
Date:    (1 minutes ago) 2013-10-31 11:45:07 +0100
Subject: Added building

Commit:  fc9e9e6d97e979293a028857d275eef31e8a0ce5
Author:  volaya <volaya@boundlessgeo.com>
Date:    (49 minutes ago) 2013-10-31 10:57:02 +0100
Subject: Initial add
The differences between any two commits can be inspected using the diff command and passing the identifiers of those commits. To see the difference between the two commits in out GeoGig repository, enter the following command in the console.
$ geogig diff fc9e9e6d97e979293a028857d275eef31e8a0ce5 c1a072734c9de17dc98dfec74d8ce169b94b90c2
000000... 9efbde... 000000... e0c8d1...   A  buildings/12976
geom    MULTIPOLYGON (((38.7636514300226 9.059704893617495, 38.764011782062425 9.059795013128007, 38.764053901132016 9.059554694383088, 38.7639837026827 9.059543140593222, 38.76399774237257 9.05946226405379, 38.763838625887445 9.059432224191653, 38.76382692614589 9.05950154694665, 38.76368652924725 9.059471507087796, 38.7636514300226 9.059704893617495)))
osm_id
name
type
It reports that this commit introduced a new feature (building/12976) with the above attributes (which are empty except for the geometry, itself, since we did not specify them).
There is no need to use the full identifiers of the commits. You can abbreviate them, e.g. using the first five digits, as in the next example.
$ geogig diff fc9e9 c1a07
If there is ambiguity and any of those shortened identifiers cannot be resolved to one and only one full identifier, GeoGig will tell you to enter a more detailed identifier.
The first identifier is the original version, while the second is the final version. Reversing them will give you the opposite difference.
$ geogig diff c1a07 fc9e9
9efbde... 000000... e0c8d1... 000000...   R  buildings/12976
Removals (R) are not detailed as in the case of additions (A). Only the name of the removed feature is shown.
GeoGig support several syntaxes to specify the commits you want to compare with the diff command or any other command that takes a commit as input. The next line will produce the same output as the one using the full identifiers.
$ geogig diff HEAD~1 HEAD
HEAD refers to the current last commit in the history, while HEAD~1 refers to its parent (the previous commit). This line will compare the two last commits, without having to know their identifiers.
Cloning the repo from the filesystem
One of the most important features of GeoGig is that data can be synchronized between repositories, so you can have several of them versioning the same data and share the changes made in each them with the other repositories.
You can create a new local copy of your repository by running the clone. Move to the parent directory of your repository folder and enter this in the console:
$geogig clone ./geogig-ethiopia geogig-ethiopia-clone
Cloning into 'geogig-ethiopia-clone'...
100%
Done.
Now you should have two folders, geogig-ethiopia and geogig-ethiopia-clone, each of them corresponding to a GeoGig repository. If you change your current directory to one of them, the geogig commands that you run will apply to the repository contained in that folder.
Right now, both repositories are identical. You can check that by moving into the geogig-ethiopia-clone folder and inspecting the log of the GeoGig repository it contains.
$ cd geogig-ethiopia-clone
$ geogig log
Commit:  c1a072734c9de17dc98dfec74d8ce169b94b90c2
Author:  volaya <volaya@boundlessgeo.com>
Date:    (1 minutes ago) 2013-10-31 11:45:07 +0100
Subject: Added building

Commit:  fc9e9e6d97e979293a028857d275eef31e8a0ce5
Author:  volaya <volaya@boundlessgeo.com>
Date:    (49 minutes ago) 2013-10-31 10:57:02 +0100
Subject: Initial add
We will add more snapshots to the original repository and then see how to synchronize with the cloned one, so the cloned one gets the changes that we have introduced in the original repository.
Making more edits to the PostGIS database
Go back to QGIS and make some more edits. You can add a new building from the ones that are not in yet digitized. Also, let’s make a modification so we can later see how GeoGig handles that kind of edits. The feature with the id 8868 represents and administrative building, but its type attribute is NULL. Correct that by entering administrative in the corresponding cell in the attribute table. When the layer is in edit mode you can edit table cells by double–clicking on them.
Save the changes to the PostGIS database as it has already been explained.
Committing edits to original GeoGig Repo
Go to the console and create a new version by importing, adding and committing your changes. Make sure you are under the geogig-ethiopia folder, so you are committing to the original repository, not the cloned one.
The commands are the same one that we used for creating our second commit, except for the commit message.
$ geogig pg import --database geogig_ethiopia --user geogig --password geogig --table buildings --port 54321
$ geogig add
$ geogig commit -m "Added more buildings and corrected missing field value"
The differences between the two last commits now look like this.
$ geogig diff HEAD~1 HEAD
9efbde... 9efbde... 546e31... 62c2e8...   M  buildings/8868
type: [MISSING] -> administrative

000000... 9efbde... 000000... cacef3...   A  buildings/12977
geom    MULTIPOLYGON (((38.75429818070351 9.061127964604221, 38.75435886071902 9.060998131885604, 38.7545105607578 9.061028093286371, 38.754490334085965 9.061147938864453, 38.75429818070351 9.061127964604221)))
osm_id
name
type
It shows the modifications done to the attributes of a existing feature and the description of a newly added feature.
Pulling changes into the cloned repository
If you move to the geogig-ethiopia folder and see the log of the repository, you will see that the last commit that we made is not here. Repositories are independent and the changes were only committed to the original repository. However, we can bring those changes to the cloned repository by using the pull command.
$ geogig pull
100%
From [parentfolder]/geogig_ethiopia/
   c1a0727..82c4634     master -> refs/heads/master
Features Added: 1 Removed: 0 Modified: 1
If you now run the log command you will see that there are 3 commits in the cloned repository and it has the same history as the original.
Running the diff command will also produce the same result as in the original repository.
You can pull changes from any repository that versions the same data. In that case, you should tell the pull command how to find that repository. In this case, however, we are pulling from the default parent repository, which is the original. When a repository is cloned, GeoGig saves a reference to the original repository, which the pull command defaults to in the case that no repository is specified.
Expose Clone with Webservices using GeoServer
Add the clone as a remote to the original repo:
geogig remote add clone http://localhost:8080/geoserver/geogig/opengeo:ethiopia
Make more Edits against PostGIS in QGIS:
- Start an editing session
- Add new features
- Modify existing features
- Modify existing attributes
- End editing session and save
Import Edits to original repo:
geogig pg import
geogig add
geogig commit -m "More building changes"
Push edits to clone via remote API
To pass changes from one repository, you can use the
pullcommand as we have already seen, or you can send changes to a remote repository with the push command. Let’s see how to move the latest changes in the original repository to the clone repository.The original repository doesn’t know anything about the clone, so you have to add a reference to it using the
remote addcommand.
$ geogig remote add cloned http://localhost:8080/geoserver/geogig/opengeo:ethiopia
You can check that the remote reference has been added by listing all available remotes.
$ geogig remote list -v
clone http://localhost:8080/geoserver/geogig/opengeo:ethiopia (fetch)
clone http://localhost:8080/geoserver/geogig/opengeo:ethiopia (push)
![]()