Branches
It is possible to work with a GeoGig repository in a linear fashion, adding new commits one after another. However, GeoGig allows for managing several histories in our repository, creating a tree-like structure. These separate histories are called branches.
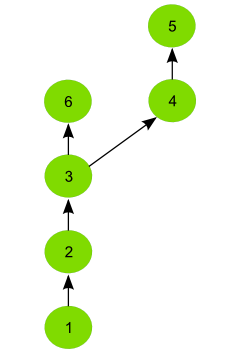
The following figure shows a branch-based workflow.
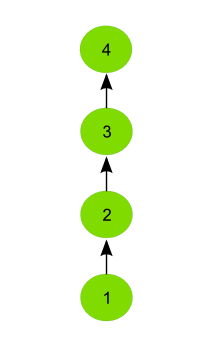
The linear workflow is just a succession of commits, each one with a single parent and child, as shown here.
Branches are useful if you want to work on your data and version your changes, but you do not want to mix your new work with the rest of the data until a later time.
For instance, imagine that you have a rather large dataset and you want to add new attributes to its features. If you are using a linear workflow, over the course of the work updated features may coexist with the original unedited ones, which might cause problems for users of the repository.
Creating a branch and performing your edits there solves this problem. Branching allows you to have a new context in which to work, without worry of causing interference.
The work on the new branch is completely independent of the current contents of any other branch. Once you have finished your work, you can pass your changes to the main branch.
Each branch has a name that is given to it when it is created. The main branch that is created when initializing the repository is called master.
You can start working and creating new commits, and they will be added on top of the current branch, instead of on top of master.
Creating a new branch
To create a new branch use the following command:
geogig branch newbranch
Where newbranch is the name of the new branch.
The above command creates a new branch, but does not change to be working on that branch. To change to that branch you have to subsequently perform a checkout. Use the following command to move into a branch.
geogig checkout newbranch
To create a new branch and move to that branch in one command, use the -c option:
geogig branch -c newbranch
When performing a branch checkout, GeoGig puts the data from the tip of that branch (the most recent commit) in the working tree. For this reason, the working tree has to be clean (no unstaged changes) before doing a checkout.
Branch references
When a branch is created, a reference is created with the name of the branch. That reference will always point to the latest commit made on that branch. When the branch is checked out, GeoGig changes the HEAD reference to point at the reference denoting the branch you have checked out. So if HEAD was linked to the master branch and its corresponding reference, but after a checkout of a different branch HEAD changes automatically.
The name of the branch is, itself, a valid reference. For this reason, you can use it to reference an object under that branch. For instance, to see a description of a feature named 1 in a tree called parks in the edits branch, you can use the following command.
geogig show edits:parks/1
![]()