Merging branches
When working on a branch, a typical workflow will eventually involve copying that work onto another branch, most often the master branch.
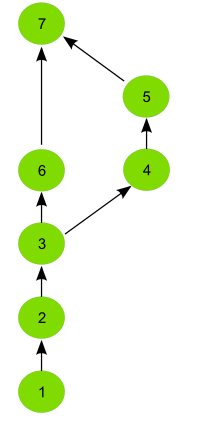
Merging is usually done when you have finished working on a given branch and you think the modifications that you have made are ready to become part of the main (master) branch. When that is the case, you will apply all the same changes that you have made to the features and trees in that branch onto the features and trees in the master branch, so the master branch will contain changes from both branches.
The following graphic describes this procedure:
Merging is done using the geogig merge command. Change to the destination branch (in most cases, master) and perform the following command.
geogig merge mybranch
This will add new commits from the mybranch branch to the master branch.
Once you have merged your changes, you may wish to delete the branch. Do this by invoking the -d option on the branch command.
geogig branch -d mybranch
Merge conflicts
When merging two branches, the changes made may not be compatible. For instance, if both branches have modified the same attribute value of the same feature, that will cause a conflicting situation that GeoGig cannot solve automatically. In such a case, GeoGig will merge all the compatible changes and leave the conflicting ones marked, so they can be manually resolved and then committed.
When a merge operation finds conflicts and it cannot automatically merge all the changes, it shows a message like the one shown below.
CONFLICT: Merge conflict in parks/2
CONFLICT: Merge conflict in parks/3
CONFLICT: Merge conflict in parks/1
Automatic merge failed. Fix conflicts and then commit the result.
You can check which elements are conflicted by running the geogig status command. The result will be similar to that shown next.
# On branch master
# Unmerged paths:
#   (use "geogig add/rm <path/to/fid>..." as appropriate to mark resolution
#
#      unmerged  parks/2
#      unmerged  parks/3
#      unmerged  parks/1
# 3 total.
The above message shows a repository with three conflicted features in its index. If there are unstaged elements, they will also be shown as usual. If the merge operation staged elements that did not cause any conflict, they will appear as ready to be committed. These elements will also be changed in the working tree, to reflect the same version that is stored in the index, which is the result of the automatic merge operation.
When a conflict arises, the merge operation is interrupted. Conflicted elements are marked in the index under the heading unmerged paths and the user must resolve these manually. This is done by picking a change from one branch or the other, or by some combination of the two.
Note
“Unmerged paths” is another name for a conflicted element.
Types of conflicts
The following cases will create a merge conflict when the following situations occur on both branches.
- Modifying the same attribute of a feature (including geometries), setting different values.
- Modifying an attribute in a feature (on one branch), deleting that attribute (on another branch).
- Adding different features under the same path.
- Modifying the default feature type for a given path, setting different values.
- One branch has deleted a tree while the other has a feature under that tree added or modified.
- Both branches have a modified feature, at least one of them has changed its feature type, and the resulting feature types are not the same.
The following cases will not produce a merge conflict when the following situations occur on both branches.
- Adding the same feature at the same path.
- Deleting the same feature.
- Modifying the same attribute in a feature (including geometries), setting the same new value.
- Setting the same new default feature type for a path.
- Editing the same feature, but modifying different attributes.
In general, whenever the situation doesn’t have a clear path to resolution, GeoGig will report a conflict for the sake of safety.
Showing conflicts
The conflicts command can be used to describe the current unmerged elements. There are three ways of displaying conflicts:
- Running
geogig conflictswill print the full descriptions of the versions involved in the conflict: the common ancestor, “ours” (current branch) and “theirs” (the branch to merge). The descriptions of the involved elements are the same ones that would be obtained by calling the GeoGigcatcommand on each of them. - Running
geogig conflicts --diffwill output a representation with diff-like syntax instead of full descriptions, showing only those attributes the differ. It uses the same syntax as thediffcommand, described in the Showing differences section, which makes it easier to see why the conflict arises and how to solve it. - Running
geogig conflicts --ids-onlywill return just the IDs of the three versions corresponding to each unmerged element.
Solving using the merge tool
The most practical way to solve the merge conflicts is using the merge tool.
Merging more than two branches
The merge command accepts more than one single branch name as entry. If several branch names are provided, it will perform what is know as an octopus merge.
The following situations will cause GeoGig to fail the octopus merge process:
- A conflict on any type exist, whether it is a conflict between two branches or between many of them at the same time.
- A feature has been edited by at least two branches, and the changes introduced are not identical. Even if the changes are compatible (for instance, if branches have edited values for different attributes), GeoGig will not perform an automerge and the merge operation won’t be executed.
In these cases, you will have to merge branches individually, solving conflicts for each of them one by one.
Unlike a standard two branch merge, where the process will partially complete, a conflict will cause an octopus merge to not even start.
Staging a merged version of a conflicted element
Using the geogig add command, features can be staged in the usual way. When a feature is staged, it is not in a conflicted state. Running the add command will solve the conflicted merge. Before this can be done, you must pick which version of the commit to merge.
GeoGig uses “ours” and “theirs” notation, with “ours” referring to the current branch, and “theirs” referring to the other branch.
To select the feature from the current branch:
geogig checkout -p <path_to_feature> --ours
To select the feature from the other branch:
geogig checkout -p <path_to_feature> --theirs
Alternately, you can import a new feature using one of the importing tools from GeoGig or delete the conflicted feature entirely using the rm command. The latter option will remove it from both the working tree and the index, as well as the commit. There is no need to call add afterwards, unless you have staged some other element to solve a different conflict.
Once you have the correct version that you want to commit, run add to stage it and then run commit to finally commit your resolved elements and finish the merge.
In a standard commit, you usually must supply a commit message using the -m switch. In the case of a merge, you can also run geogig merge without a commit message. In the conflict case, the default message would look something like this:
Merge branch refs/heads/b1

Conflicts:
  parks/2
  parks/3
  parks/1
Aborting the merge operation
You can abort the merge operation and restore it to the original state it had before you invoked the merge command. You have the following alternatives, which will effect the same result.
geogig reset --hard ORIG_HEAD
geogig merge --abort
Warning
This is not like git. The --abort seen here is just a reset operation.
![]()